討論同步(Sync)與非同步(Async)
標準寫法
<body>
    <div id="info"></div>
<script>
    info = document.querySelector('#info');
    info.innerHTML = 'Hello Nodejs Sync';
</script>
</body>
偷懶寫法
<body>
    <div id="info"></div>
<script>
    # info = document.querySelector('#info');
    info.innerHTML = 'Hello Nodejs Sync';
</script>
</body>
最容易觀察到的Sync現象
若再加上 alert('Hello');
<body>
    <div id="info"></div>
<script>
    // info = document.querySelector('#info');
    info.innerHTML = 'Hello Nodejs Sync';
    alert('Hello');
</script>
</body>
再執行網頁時,將發現alert的對話視窗先出現,點擊對話視窗的按鈕關閉對話視窗後,才會執行 info.innerHTML = 'Hello Nodejs Sync'; ,WHY?
瀏覽器要等你把這件事情做完,瀏覽器才會繼續往下做
alert(), confirm(), prompt()這三種對話視窗是很早期瀏覽器就提供的功能,早期的時候沒有太複雜的想法,如果網頁有使用到alert(), confirm(), prompt(),則瀏覽器會先執行alert(), confirm(), prompt(),其他的JavaScript語法則全部暫停,直到alert(), confirm(), prompt()處理完畢後才會再繼續執行。所以當有alert()出現的時候,必須等到用戶按下確定後,JavaScript的程式才會再繼續往下跑。
再加一個console.log()
同樣也會等alert()做完之後,才會繼續往下做。
<body>
    <div id="info"></div>
<script>
    // info = document.querySelector('#info');
    info.innerHTML = 'Hello Nodejs Sync';
    alert('Hello');
    console.log('ok');
</script>
</body>
使用Ajax來測試同步與非同步的表現
首先在index.js的路由加上ok與pending這兩個路由,分別代表順利取得網頁與長時間取得網頁(沒有回傳)
app.get('/pending', function (req, res) {
    // res.send('Hello World!');
});
app.get('/ok', function (req, res) {
    res.send('ok!');
});
app.use(express.static('public'));
由於有設定靜態路由,所以我們在\public資料夾中加上以下檔案:
<body>
    <button onclick="doAjax()">doAjax</button>
    <div id="info"></div>
    <button>test click</button>
    <input type="text" name="kk123">
<script>
    function doAjax(){
        const xhr = new XMLHttpRequest();
        xhr.onreadystatechange = function (event){
            console.log(xhr.status, xhr.readyState);
        }
        xhr.open('GET','/pending', false)
        xhr.send();
    }
</script>
</body>
注意以下四種可能性:
-
xhr.open('GET','/ok', false):模擬順利取得網頁,且同步處理 -
xhr.open('GET','/ok', true):模擬順利取得網頁,且非同步處理 -
xhr.open('GET','/pending', false):模擬長時間取得網頁(pending),且同步處理 -
xhr.open('GET','/pending', true):模擬長時間取得網頁(pending),且非同步處理
可以調整以上四種情境,並觀察網頁行為。
使用jQuery
- 使用未壓縮的jQuery 3.5.1版:https://code.jquery.com/jquery-3.5.1.js
- 將以上js檔放到靜態路由中,即放到
\
使用Bootstrape
- 使用Bootstrape 4.5.2:Download · Bootstrap v4.5
- 下載Compiled CSS and JS:https://github.com/twbs/bootstrap/releases/download/v4.5.2/bootstrap-4.5.2-dist.zip
- 解壓縮後,將bootstrape資料夾放在靜態路由
\public下面
開始使用jQuery與Bootstrape
- 先建立一個網頁如下,並掛接jQuery與Bootstrape
<!DOCTYPE html>
<html lang="en">
<head>
    <meta charset="UTF-8">
    <meta name="viewport" content="width=device-width, initial-scale=1.0">
    <link rel="stylesheet" href="bootstrap/css/bootstrap.css">
    <title>Document</title>
</head>
<body>

<script src="./js/jquery-3.5.1.js"></script>
<script src="./bootstrap/js/bootstrap.bundle.js"></script>
</body>
</html>
- 到Bootstrape網頁上面查看範例:Alerts · Bootstrap v4.5
- 開始摳貼
- 先來試試Navbar吧:Navbar · Bootstrap v4.5 ,將以下範例HTML貼到網頁中
<nav class="navbar navbar-expand-lg navbar-light bg-light">
  <a class="navbar-brand" href="#">Navbar</a>
  <button class="navbar-toggler" type="button" data-toggle="collapse" data-target="#navbarSupportedContent" aria-controls="navbarSupportedContent" aria-expanded="false" aria-label="Toggle navigation">
    <span class="navbar-toggler-icon"></span>
  </button>

  <div class="collapse navbar-collapse" id="navbarSupportedContent">
    <ul class="navbar-nav mr-auto">
      <li class="nav-item active">
        <a class="nav-link" href="#">Home <span class="sr-only">(current)</span></a>
      </li>
      <li class="nav-item">
        <a class="nav-link" href="#">Link</a>
      </li>
      <li class="nav-item dropdown">
        <a class="nav-link dropdown-toggle" href="#" id="navbarDropdown" role="button" data-toggle="dropdown" aria-haspopup="true" aria-expanded="false">
          Dropdown
        </a>
        <div class="dropdown-menu" aria-labelledby="navbarDropdown">
          <a class="dropdown-item" href="#">Action</a>
          <a class="dropdown-item" href="#">Another action</a>
          <div class="dropdown-divider"></div>
          <a class="dropdown-item" href="#">Something else here</a>
        </div>
      </li>
      <li class="nav-item">
        <a class="nav-link disabled" href="#" tabindex="-1" aria-disabled="true">Disabled</a>
      </li>
    </ul>
    <form class="form-inline my-2 my-lg-0">
      <input class="form-control mr-sm-2" type="search" placeholder="Search" aria-label="Search">
      <button class="btn btn-outline-success my-2 my-sm-0" type="submit">Search</button>
    </form>
  </div>
</nav>
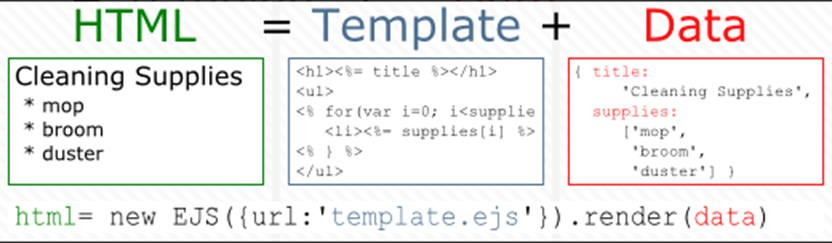
樣板引擎EJS
官網:https://ejs.co/
ejs套件網址:ejs - npm
安裝ejs:npm i ejs
在專案中新增一個 \views 資料夾,作為存放樣板的位置,資料夾的名稱預設是 \views,若要改成其他名稱也可以,但是就是要在 index.js 加註語法
app.set('views', __dirname + '/../views'); // 設定樣板路徑
設定EJS
在index.js中,加入以下程式碼:
// 註冊樣版引擎
app.set('view engine', 'ejs');    // 注意「view engine」不要打錯字,大小寫不要打錯,不要多餘的s或空格
// 設定views路徑 (選擇性設定)
// app.set('views', __dirname + '/../views');
indes.js的設定如下:
// 1. 引入 express
var express = require('express');
// 2. 建立 web server 物件
var app = express();
// 註冊樣版引擎
app.set('view engine', 'ejs');
// 設定views路徑 (選擇性設定)
// app.set('views', __dirname + '/../views');

// 3. 路由
app.get('/', function (req, res) {
    res.send('Hello World!');
});
.........
.........
針對Visual Studio Code安裝EJS外掛

開始用EJS開發網站
- 在views資料夾下,新增一個檔案,檔名設定為「main.ejs」(記住副檔名為ejs)
EJS標籤
說明網址:EJS -- Embedded JavaScript templates
-
<%‘Scriptlet’ tag, for control-flow, no output -
<%_‘Whitespace Slurping’ Scriptlet tag, strips all whitespace before it -
<%=Outputs the value into the template (HTML escaped) -
<%-Outputs the unescaped value into the template -
<%#Comment tag, no execution, no output -
<%%Outputs a literal ‘<%’ -
%>Plain ending tag -
-%>Trim-mode (‘newline slurp’) tag, trims following newline -
_%>‘Whitespace Slurping’ ending tag, removes all whitespace after it
我們要先練習這個標籤 <%= ,其功能類似php的echo。
我們在main.ejs內輸入以下程式碼:
<%= name %>
其中,name 在樣板裡面算是一個變數。
在 index.js 中,原本的程式使用send輸出資訊到瀏覽器:
app.get('/', function (req, res) {
    res.send('Hello World!');
});
但若要使用樣板引擎,就不要使用 send 了,要改而使用 render,所以原程式要改為:
app.get('/', function (req, res) {
    res.render('main',
        {name:'Benjamin'} // 物件
    );    // main為樣板檔案的名稱,對應main.ejs,副檔名可不用寫
});
啟動server後(指令nodemon),連到主頁:http://localhost:3000,即可看到顯示名字資訊。
從JSON檔取得資料
- 建立一個資料夾
data - 新增一個檔案
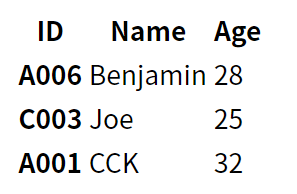
sales.json,資料如下:(注意在JSON中,只能使用雙引號,不可使用單引號)
[
    {
        "name":"Benjamin",
        "age":28,
        "id":"A006"
    },
    {
        "name":"Joe",
        "age":25,
        "id":"C003"
    },
    {
        "name":"CCK",
        "age":32,
        "id":"A001"
    }
]
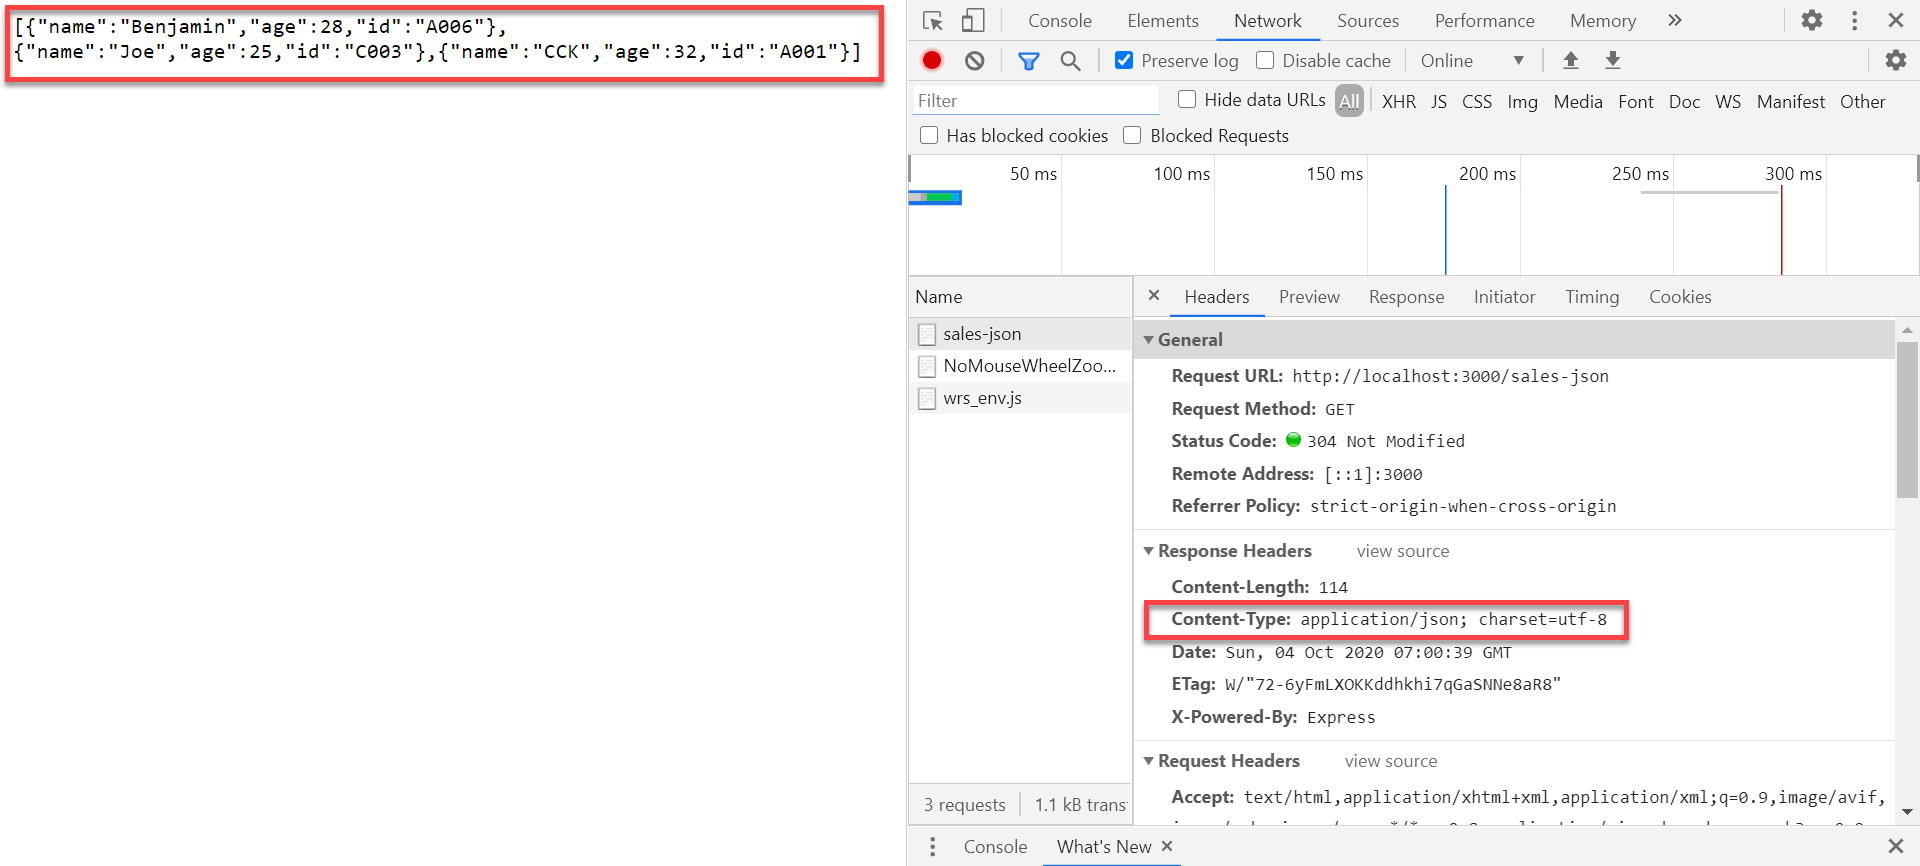
在 index.js 加上以下路由:
app.get('/sales-json', function (req, res) {
    const data = require(__dirname+'/../data/sales.json');
    res.json(data); // 以json顯示於網頁
});
瀏覽 http://localhost:3000/sales-json ,即可看到JSON檔案直接輸出於瀏覽器。
現在在views資料夾中,新增一個 sales-json.ejs檔案,然後在indes.js中,把路由修改為:
app.get('/sales-json', function (req, res) {
    const sales = require(__dirname+'/../data/sales.json');  //變數名稱為sales
    res.render('sales-json', {sales})  //這樣寫法表示數名名稱跟變數名稱一樣都是sales
});
由於在sales.json裡面,是由三個物件組成的array,我們要用迴圈把這個array拆解顯示於網頁上。為了選擇合適的呈現方式,我們可以到bootstrape官網上面尋找合適的範例。
views/sales-json.ejs的檔案內容改寫如下:
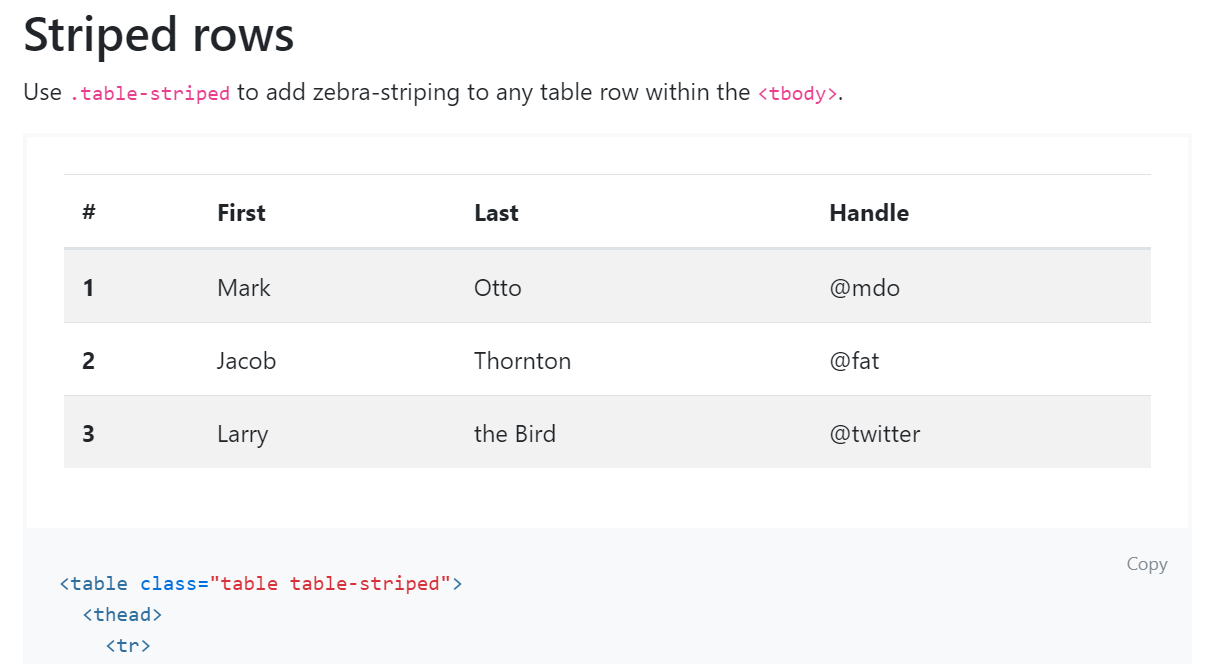
<table class="table table-striped">
    <thead>
        <tr>
            <th scope="col">ID</th>
            <th scope="col">Name</th>
            <th scope="col">Age</th>
        </tr>
    </thead>
    <tbody>
        <% for (const i of sales) {%>
        <tr>
            <th scope="row"><%=i.id%></th>
            <td><%=i.name%></td>
            <td><%=i.age%></td>
        </tr>
        <%} %>
    </tbody>
</table>
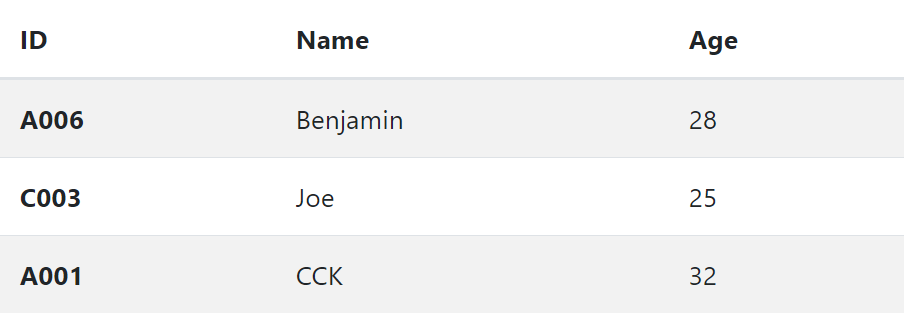
然後連線到 http://localhost:3000/sales-json ,可以得到以下結果:
之所以沒有呈現bootstrape的格式,是因為沒有引入bootstrape的css與js,若將sales-json.ejs修改如下,即可呈現bootstrape的程式:
<!DOCTYPE html>
<html lang="en">

<head>
    <meta charset="UTF-8">
    <meta name="viewport" content="width=device-width, initial-scale=1.0">
    <link rel="stylesheet" href="bootstrap/css/bootstrap.css">
    <title>Document</title>
</head>

<body>

<table class="table table-striped">
    <thead>
        <tr>
            <th scope="col">ID</th>
            <th scope="col">Name</th>
            <th scope="col">Age</th>
        </tr>
    </thead>
    <tbody>
        <% for (const i of sales) {%>
        <tr>
            <th scope="row"><%=i.id%></th>
            <td><%=i.name%></td>
            <td><%=i.age%></td>
        </tr>
        <%} %>
    </tbody>
</table>
<script src="./js/jquery-3.5.1.js"></script>
<script src="./bootstrap/js/bootstrap.bundle.js"></script>
</body>

</html>
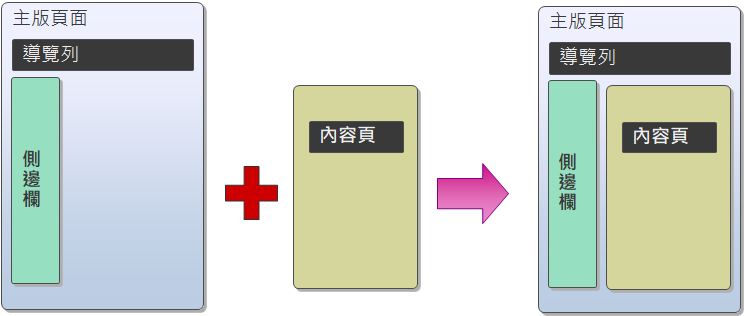
主板頁面觀念
- 固定的內容,放在主版頁面
- 變動的內容,放在內容頁
- 將主版頁面的內容,嵌進來,合成完整的一頁
- 以
<%- include( ) %>嵌入內容到主畫面,針對頁首、頁尾都是這樣做做法 - 也使用
<%- include( ) %>將<scripr></script>納入頁面 - 頁面內容為程式自資料庫提取資料後,以
res.render()將資料傳入 EJS 引擎,再以<%= %>輸出 - 頁面可以使用
if,for進行流程控制:<% if ( ) {%>…<% } %><% for ( ) { %> …<% } %>
使用EJS的include
- 建立
views\parts\html-head.ejs,並將以下程式碼填入此檔案
<!DOCTYPE html>
<html lang="en">

<head>
    <meta charset="UTF-8">
    <meta name="viewport" content="width=device-width, initial-scale=1.0">
    <link rel="stylesheet" href="/bootstrap/css/bootstrap.css">
    <title>Document</title>
</head>
<body>
- 建立
views\parts\html-foot.ejs,並將以下程式碼填入此檔案
</body>
</html>
- 建立
views\parts\scripts.ejs,並將以下程式碼填入此檔案
<script src="/js/jquery-3.5.1.js"></script>
<script src="/bootstrap/js/bootstrap.bundle.js"></script>
- 建立
views\parts\navbar.ejs,並將以下程式碼填入此檔案
<nav class="navbar navbar-expand-lg navbar-light bg-light">
    <div class="container">
        <a class="navbar-brand" href="#">Navbar</a>
        <button class="navbar-toggler" type="button" data-toggle="collapse" data-target="#navbarSupportedContent"
            aria-controls="navbarSupportedContent" aria-expanded="false" aria-label="Toggle navigation">
            <span class="navbar-toggler-icon"></span>
        </button>

        <div class="collapse navbar-collapse" id="navbarSupportedContent">
            <ul class="navbar-nav mr-auto">
                <li class="nav-item active">
                    <a class="nav-link" href="#">Home <span class="sr-only">(current)</span></a>
                </li>
                <li class="nav-item">
                    <a class="nav-link" href="#">Link</a>
                </li>
                <li class="nav-item dropdown">
                    <a class="nav-link dropdown-toggle" href="#" id="navbarDropdown" role="button"
                        data-toggle="dropdown" aria-haspopup="true" aria-expanded="false">
                        Dropdown
                    </a>
                    <div class="dropdown-menu" aria-labelledby="navbarDropdown">
                        <a class="dropdown-item" href="#">Action</a>
                        <a class="dropdown-item" href="#">Another action</a>
                        <div class="dropdown-divider"></div>
                        <a class="dropdown-item" href="#">Something else here</a>
                    </div>
                </li>
                <li class="nav-item">
                    <a class="nav-link disabled" href="#" tabindex="-1" aria-disabled="true">Disabled</a>
                </li>
            </ul>
            <form class="form-inline my-2 my-lg-0">
                <input class="form-control mr-sm-2" type="search" placeholder="Search" aria-label="Search">
                <button class="btn btn-outline-success my-2 my-sm-0" type="submit">Search</button>
            </form>
        </div>
    </div>
</nav>
- 原
views\sales-json.ejs內的程式更改如下:
<%- include ('parts/html-head') %>
<%- include ('parts/navbar') %>
<div class="container">
    <table class="table table-striped">
        <thead>
            <tr>
                <th scope="col">ID</th>
                <th scope="col">Name</th>
                <th scope="col">Age</th>
            </tr>
        </thead>
        <tbody>
            <% for (const i of sales) {%>
            <tr>
                <th scope="row"><%=i.id%></th>
                <td><%=i.name%></td>
                <td><%=i.age%></td>
            </tr>
            <%} %>
        </tbody>
    </table>
</div>
<%- include('parts/scripts') %>
<%- include('parts/html-foot') %>
URL標準
URL標準來自於 WHATWG URL標準
取得queryString資料
在indes.js加上以下路由:
app.get('/try-qs',function (req, res) {
    res.json(req.query);
});
測試:
- http://localhost:3000/try-qs?a=1
- http://localhost:3000/try-qs?a=1&b=2
- http://localhost:3000/try-qs?a=1&b=2&a=3
- http://localhost:3000/try-qs?a=1&b=2&a[]=3
- http://localhost:3000/try-qs?a[age]=1&b=2&a[name]=3
也可以使用 url 套件來取得網址資訊
先要在 index.js 引入 url 模組
const url = require("url");
url模組方法
- url.parse( ) 解析網址
- url.format( ) 建構網址
- url.resolve( ) 組裝網址
Example:
var url = require('url');
var adr = 'http://localhost:8080/default.htm?year=2017&month=february';
var q = url.parse(adr, true);

console.log(q.host); //returns 'localhost:8080'
console.log(q.pathname); //returns '/default.htm'
console.log(q.search); //returns '?year=2017&month=february'

var qdata = q.query; //returns an object: { year: 2017, month: 'february' }
console.log(qdata.month); //returns 'february'
取得完整網址:
req.headers.host + req.url
取得POST資料
使用express物件的 body-parser功能
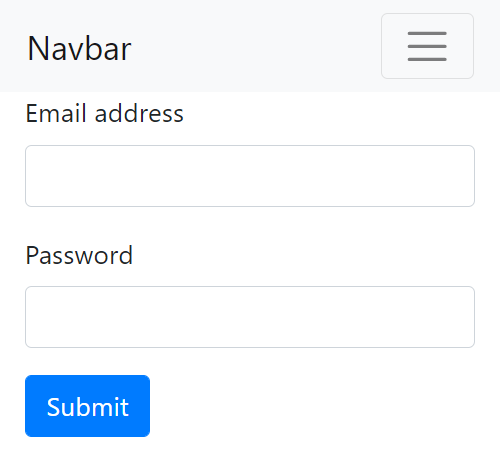
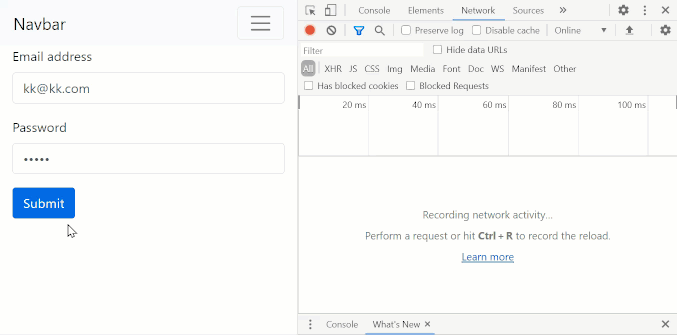
建立 views\try-post-form.ejs
<%- include ('parts/html-head') %>
<%- include ('parts/navbar') %>
<div class="container">
<form method="post">
<div class="form-group">
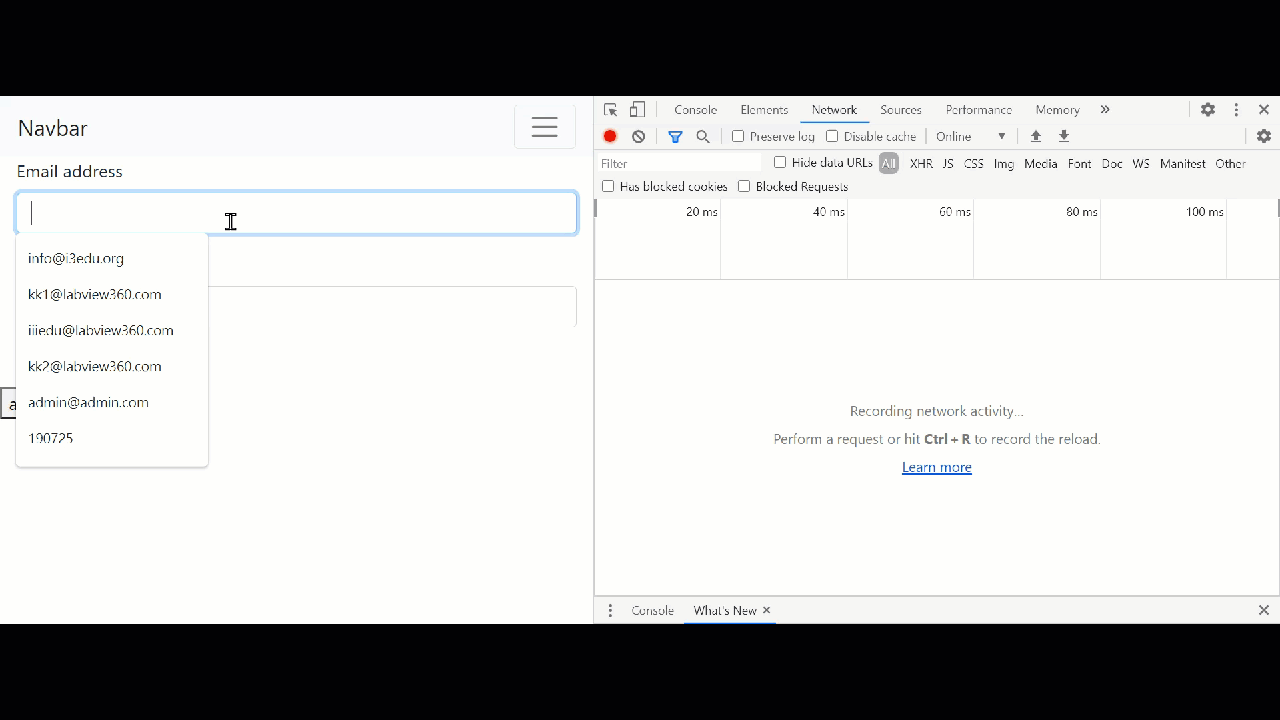
<label for="email">Email address</label>
<input type="email" class="form-control" id="email" name="email">
</div>
<div class="form-group">
<label for="password">Password</label>
<input type="password" class="form-control" id="password" name="password">
</div>
<button type="submit" class="btn btn-primary">Submit</button>
</form>
</div>
<%- include('parts/scripts') %>
<%- include('parts/html-foot') %>
在 index.js 建立以下路由:
app.get('/try-post-form', function (req, res) {
    res.render('try-post-form');
});
const urlencodedParser = express.urlencoded({extened:false});
// 使用http的post方法
app.post('/try-post-form', urlencodedParser, function (req, res) {
    req.body.haha='aabbb';
    res.json(req.body);
});
當瀏覽http://127.0.0.1:3000/try-post-form時,會先get得到views\try-post-form.ejs樣板。
輸入email與password並送出後,就會進入以下路由:
app.post('/try-post-form', urlencodedParser, function (req, res) {
    req.body.haha='aabbb';
    res.json(req.body);
});
並得到json。
Top-level Middleware
- 將 body-parser 設定成頂層 middleware,放在所有路由之前。
- 其包含兩種解析功能: urlencoded 和 json 。
// 引入套件
const bodyParser = require('body-parser');
// parse application/x-www-form-urlencoded
app.use(bodyParser.urlencoded({ extended: false }));
// parse application/json
app.use(bodyParser.json());
以上考慮到兩種coontent type,分別是application/x-www-form-urlencoded與application/json,每一次瀏覽時只有選到一種content-type,所以一次瀏覽只會進入一種情況。

views\try-post-form.ejs可以改寫為:
<%- include ('parts/html-head') %>
<%- include ('parts/navbar') %>
<div class="container">
    <form method="post">
        <div class="form-group">
            <label for="email">Email address</label>
            <input type="email" class="form-control" id="email" name="email">
            <% if (typeof(email)!=='undefined'){ %>
            <small>上一次輸入:<%= email %> </small>
            <% } %>
        </div>
        <div class="form-group">
            <label for="password">Password</label>
            <input type="password" class="form-control" id="password" name="password">
            <% if (!! locals.password) {%>
            <small>上一次輸入:<%= password %> </small>
            <% } %>
        </div>
        <button type="submit" class="btn btn-primary">Submit</button>
    </form>
</div>
<%- include('parts/scripts') %>
<%- include('parts/html-foot') %>
index.js改為:
app.get('/try-post-form', function (req, res) {
    res.render('try-post-form');
});
app.post('/try-post-form', (req, res)=>{
    res.render('try-post-form', req.body)
});
若為get,沒有接收回傳資料;若為post,有接收回傳資料。
使用ajax傳送資料
\views\try-post-form.ejs的內容如下:
<%- include ('parts/html-head') %>
<%- include ('parts/navbar') %>
<div class="container">
    <form method="post">
        <div class="form-group">
            <label for="email">Email address</label>
            <input type="email" class="form-control" id="email" name="email">
            <% if (typeof(email)!=='undefined'){ %>
            <small>上一次輸入:<%= email %> </small>
            <% } %>
        </div>
        <div class="form-group">
            <label for="password">Password</label>
            <input type="password" class="form-control" id="password" name="password">
            <% if (!! locals.password) {%>
            <small>上一次輸入:<%= password %> </small>
            <% } %>
        </div>
        <button type="submit" class="btn btn-primary">Submit</button>
    </form>
</div>
<%- include('parts/scripts') %>
<div id="info"></div>
<button onclick="doAjax();">ajax send</button>
<script>
    function doAjax(){
        $.post('/try-json-post', $('form').serialize(), function(data){
            info.innerHTML=data;
        }, 'text')
    }
</script>
<%- include('parts/html-foot') %>
index.js
app.post('/try-post-form', (req, res)=>{
    res.render('try-post-form', req.body)
});
app.post('/try-json-post', (req, res)=>{
    req.body.haha='labview360';
    req.body.contentType=req.get('Content-Type');
    res.json(req.body);
});